
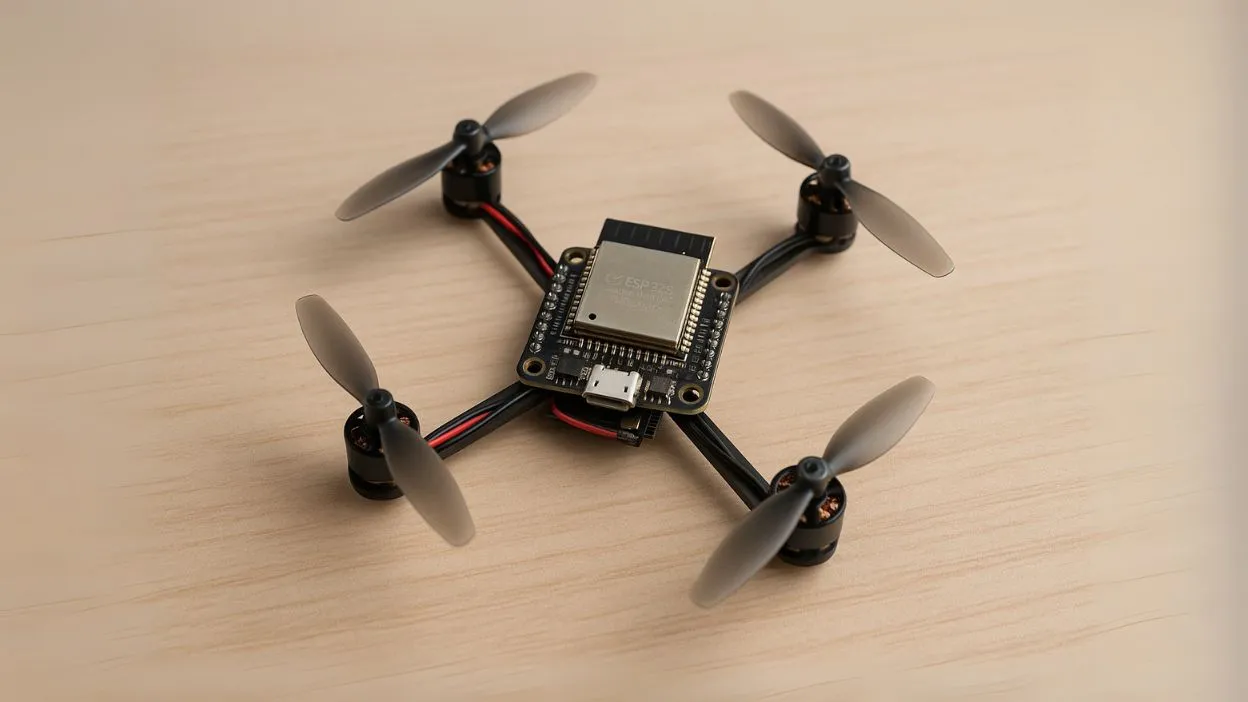
Flix v1 is a fully open source, Arduino based quadcopter built on an ESP32 D1 Mini and low cost IMUs (GY-91 or ICM-20948). Designed for education, research, and experimentation, Flix emphasizes simplicity and clarity:
- Clean, easy to follow Arduino code
- 3D‑printed frame optimized for minimal build time
- Precise Gazebo simulation, running the same flight code
- WiFi & MAVLink support, enabling remote control & telemetry
- WCLI (Wireless Command Line Interface) for real time monitoring
- Flight control textbook in development, plus plans for position control/autonomy
You can pilot Flix with a smartphone, RC transmitter (SBUS), or computer via MAVLink/WiFi. The project includes everything from 3D-print files and wiring schematics to simulation setup, deployment instructions, and flight logs. It’s perfect for diving into drone design, sensor fusion, PID controllers, and autonomous flight research all while spending under $100.
Bill of Materials & Tools
| Component | Description |
| ESP32 D1 Mini | Core flight controller: Wi‑Fi, GPIO, Arduino IDE |
| IMU | GY‑91 (MPU‑9250 + BMP280) or ICM‑20948 for orientation sensing |
| Motors | Four 8520 brushed 3.7 V motors |
| Props | 55 mm Hubsan or compatible |
| MOSFETs + resistors | 100N03A + 10 kΩ pull down resistors to drive motors |
| Battery | 1S Li-Po, ~3.7 V compatible |
| Battery connector + charger | MX2.0 2P connectors, any Li-Po charger |
| 3D-printed frame | STL files: flix frame 1.1, esp32 holder, washer m3 |
| Fasteners & wiring | M‑series screws, 28 AWG wire, tape/ties |
Tools needed:
- 3D printer (e.g., Ender 3)
- Soldering iron, solder with flux
- Multimeter, screwdrivers
Flix costs under $70 if you source components wisely ESP32 and IMU modules are ~$7, motors/props ~$20, plus batteries.
Assembly & Wiring
A. 3D Printing Frame Parts
Print with 0.2 mm layers, 100 % infill. Total print time: ~6–8 hours depending on your machine. The design features built in mounting holes for IMU and ESP32, ensuring structural rigidity without extra hardware.
B. Wiring Overview
Detailed steps in README.md:
- Mount ESP32 & IMU to the frame (orientation “LFD” default; customize in imu.ino)
- IMU → ESP32 (VSPI interface):
- GND→GND, 3.3 V→3.3 V, SCK→GPIO18, MOSI→GPIO23, MISO→GPIO19, CS→GPIO5
- MOSFET wiring: Each motor is routed through a MOSFET controlled by GPIO12/13/14/15, pulling motor ground to switch speed via PWM output
- Optional: SBUS RC receiver on UART2 (GPIO4)
Wiring Code Snippet
// motor_control.ino snippet
#define MOTOR0_PIN 12
#define MOTOR1_PIN 13
#define MOTOR2_PIN 14
#define MOTOR3_PIN 15

void setupMotors() {
  pinMode(MOTOR0_PIN, OUTPUT);
  pinMode(MOTOR1_PIN, OUTPUT);
  pinMode(MOTOR2_PIN, OUTPUT);
  pinMode(MOTOR3_PIN, OUTPUT);
}

// Inside loop: set motor PWM
analogWrite(MOTOR0_PIN, motor0Throttle);
Using 8-bit PWM on ESP32 gives decent motor control. IMU orientation adjustment can be done in imu.ino.
Software Architecture
Flix’s codebase (on GitHub as okalachev/flix) is structured modularly:
- Loop: IMU → attitude estimation → PID → motor output
- Interfaces: Wi-Fi CLI (Serial1), MAVLink for QGroundControl compatibility, SBUS RC control
- Logging & telemetry over Wi-Fi using a simple CLI, no ground station required
- Simulation interface: Gazebo plugin calls same firmware functions, making simulation results representative
Key Modules
- imu.ino: Interfaces with GY‑91 or ICM‑20948. Swap filter code by flipping rotateIMU(…).
- controller.ino: Implements cascaded PID: roll/pitch stabilize attitude; yaw and throttle handled separately
- motors.ino: Sends motor speed commands via analogWrite
- telemetry.ino: CLI and MAVLink communication
- Build scripts via Arduino CLI, and Gazebo integration with .world, .sdf, and plugin configuration
Gazebo Simulation Setup
Gazebo offers faithful virtual testing:
- Load Flix .sdf model + plugin
- Build with catkin or Gazebo makefile
- Firmware flash performed inside the simulation
- Run: $ gazebo flix.world, then $ roslaunch flix_controller.launch
While Gazebo displays model and sensors, the Arduino firmware (identical to real hardware) computes control commands. This allows:
- Validate frame geometry and stability before printing
- Tune PID gains in a safe, repeatable environment
- Accelerated iteration loop without risking components or injury
Flying Flix
- Upload firmware via Arduino IDE or CLI
- Power the drone; Wi‑Fi network “FlixDrone” appears
- Connect terminal (e.g., screen or Putty) → Observe IMU readings
- Switch flight mode:
- Manual via CLI
- SBUS RC input
- MAVLink with QGroundControl on PC/phone
- PID values can be tuned live via CLI & logged for later analysis
Flight performance:
- Stable hover indoors
- Manual acro mode flight
- Demo video shows clean laps and figure‑eights (github.com, youtube.com, projecthub.arduino.cc, youtube.com, gitverse.ru, projecthub.arduino.cc)
Code Example: PID Tuning
struct PID { float kp, ki, kd, prevErr, integral; };

PID pidRoll{4.5, 0.02, 0.12}, pidPitch{4.5,0.02,0.12};

float updatePID(PID &pid, float target, float measured, float dt) {

  float err = target - measured;

  pid.integral += err * dt;

  float derivative = (err - pid.prevErr) / dt;

  pid.prevErr = err;

  return pid.kp*err + pid.ki*pid.integral + pid.kd*derivative;

}

Tune kp, ki, kd via CLI during hover testing, then log.

// further details omitted for conciseness
Future Plans
- Position hold & autonomous waypoint flight (open-source camera system)
- PCB integration for neat layout & efficient wiring
- Flight controller textbook, covering IMU filtering, control theory, MAVLink internals
- Community-driven enhancements on GitHub and Telegram chat hubs
Troubleshooting & Tips
- IMU calibration: Run 30-sec stationary average before flight
- Motor direction mismatch: Use CLI test to reverse any
- Wi‑Fi range: Keep flights indoors; MAVLink helps with telemetry if signal drops
- Prop balancing: Critical for reducing vibe noise in IMU data
- Gazebo mismatches: Virtually tune PID, then scale for real-world inertia
Conclusion
Flix v1 is a compact, elegant educational tool ideal for:
- Learning flight dynamics & PID control
- Integrating Wi‑Fi, MAVLink, and sensor fusion
- Rapid prototyping using Gazebo simulation
- Low-cost experimental or research quadcopter
All code, models, and docs are on GitHub under open-source licensing. Contributions and extensions are encouraged—build your own Flix and join the live Telegram community!
Resources
- Demo videos & Gazebo simulation details (youtube.com)
Demo Videolink